
Opencv tutorial RTMP video streaming to NGINX restream as HLS
Video streaming Tutorial of sending processed Opencv video to NGINX and distributing video from NGINX (broadcast) by HLS stream for a wider audience, like multiple web players, VLC, or any other video stream receiver.
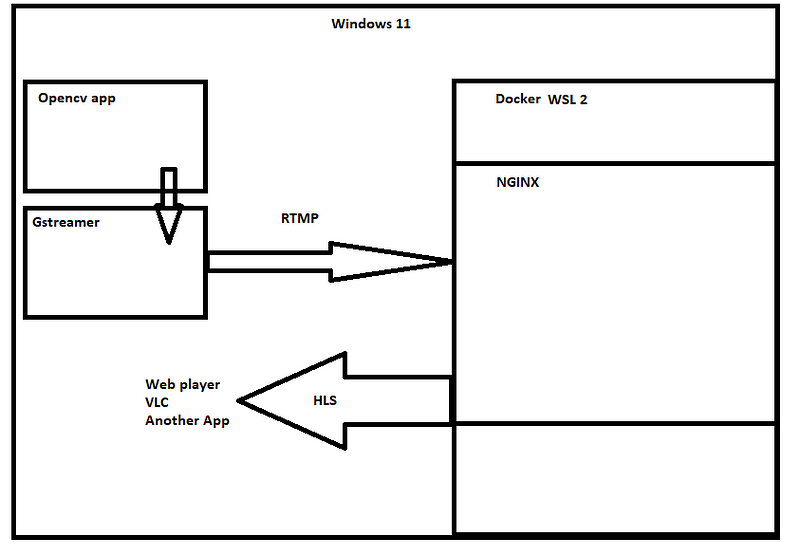
We will use GStreamer to send video from the Opencv application by rtmp2sink to an RTMP module in NGINX. In our example, the server is a widely used NGINX server with an Nginx-RTMP-module. The NGINX will receive RTMP video from Opencv and restream as an HLS video stream considered for multiple end consumers. This is a follow-up to the previous article about Video streaming from Opencv to RtspSimpleServer by rtsp protocol.
The goal is the same. Send video from Opencv to the server and restream the video for a wider audience. The difference is that RtspSimpleServer running on windows, NGINX is running in docker (WSL2). The one-to-one communication between Opencv and RtspSimpleServer was established by RTSP protocol (Gstreamer rtspclientsink). The one-to-one communication in today's tutorial between Opencv and Nginx is established by RTMP protocol rtmp2sink (Gstreamer rtmp2sink).
RTSP vs RTMP
The previous article used RTSP streaming to RtspSimpleServer by GStreamer rtspclientsin. This article uses RTMP to NGINX by GStreamer rtmp2sink. Let's discuss the difference between these two protocols.
- RTMP — Real-time messaging protocol, TCP
- RTSP — Real-time streaming protocol, UDP, multicast UDP, TCP and RTP
Should I use RTSP or RTMP? I do not know. It depends on your application. RTSP is widely used by almost all IP cameras. So, the IP camera RTSP stream is better to send to RtspSimpleServer. RTMP, on the other hand, is close to the end of support, but still used by such services as zoom, youtube live, twitch, Facebook, OBS studio.
We are sending between the Opencv app to the server. If my server is RtspSimpleServer, I will use RTSP. If my server is NGINX with RTMP module. I will most probably use RTMP to establish communication between my app and NGINX. There are other aspects like underlining container and codec to deliver my video content which is slightly important. Another aspect is communication protocol suitable for your application and environment. Both protocols do not stream directly over HTTP. The last remark on this, We have other protocols as well especially more suitable protocols to serve video to a wider audience.
Prerequisites — requirements for Opencv GStreamer application
It is really good to have some experience with building OpenCV with CMake. My environment is as follows:
- Windows 11/10
- CMake 3.22.0
- Visual Studio 2022
- OpenCV-4.5.4
- Docker with WSL2 backend
- Nginx with RTMP module https://github.com/arut/nginx-rtmp-module (We will build docker container, from docker file later)
- GStreamer MSVC 64-bit (VS 2019, Release CRT) both runtime and development installer from following links. (lead to the official website of GStreamer)
Steps to compile Opencv with Gstreamer
Since this is quite advanced, I will not go into so many details. You can still find them on my blog https://funvision.blogspot.com in posts related to GStreamer.
- Install GStreamer runtime and development MSVC 64-bit installer. Links above.
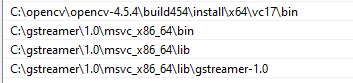
- Add GStreamer to system variable Path as on the picture below, The OpenCV will come later once lib is built. Path system variables:
- Now, restart your machine to get this, Path effected for linking your project.
- Download, extract OpenCV source OpenCV-4.5.4
- Get Visual Studio 2022 community (or 2019), Start CMake 3.22 tested https://cmake.org/download/
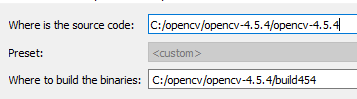
- Set source code as a folder, where you extract OpenCV
- Set “Where to build the binaries”, where your custom-built OpenCV lib will be assembled.
CMake configuration
- Hit Configure button, and select VS 2022, 64-bit compiler.
- This part is a little bit advanced. You have to hit configure several times and select options, where Cmake hit some problem with your project. I usually uncheck any Java, Python staff, where I am missing prerequisites or I simply do not care.
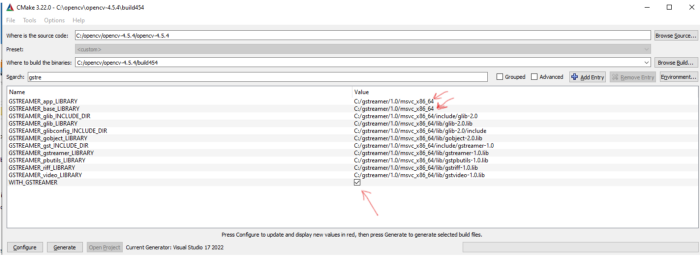
- Now, Check options WITH_FFMPEG, WITH_GSTREAMER and for GStreamer add GSTREAMER_app_LIBRARY and GSTREAMER_base_Library paths, where your GStreamer installation is located. Hit CMake Configure and all other GStreamer variables will be resolved automatically. Just follow the picture below.
- Hit configure and resolve possible problems again.
- If OK, Hit generate
- If OK, Open project in Visual Studio 2022
- Switch to solution configuration Release, x64.
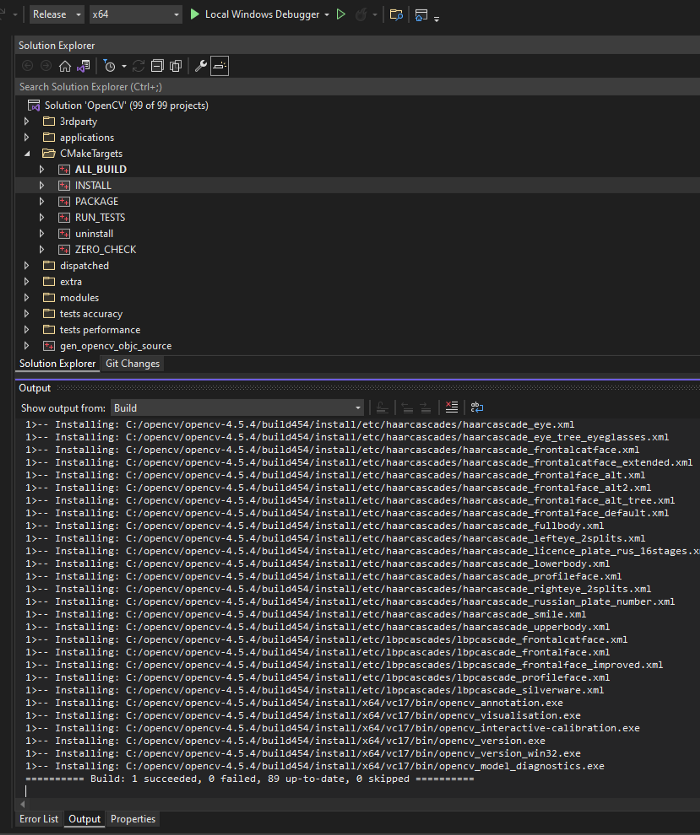
- First, build ALL_BUILD in CMakeTargets
- Then build INSTALL in CMakeTarget
OpenCV lib with FFMPEG and GStreamer is ready.
Install NGINX with RTMP module in docker
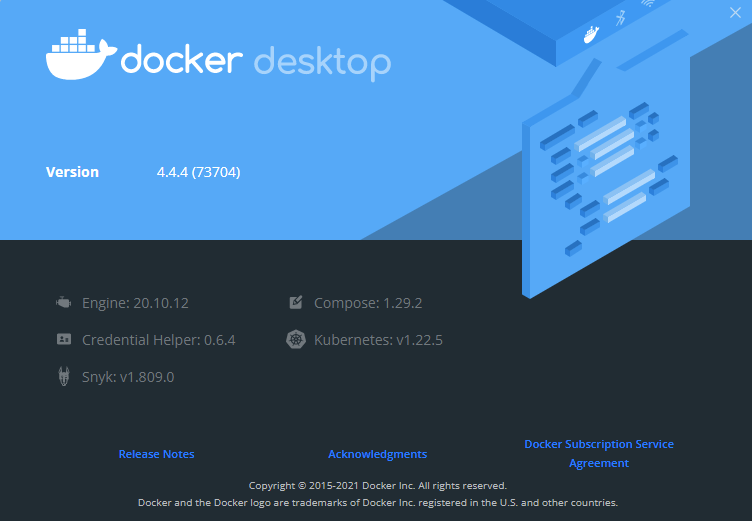
In this part, You should have some experience with docker. I am using docker desktop under Windows 10/11 with WSL2 backend. My version is 4.4.4. What a great number.
In this step, I am going to create a docker container based on the definition of the following docker file. Place the Dockerfile into one folder.
FROM buildpack-deps:stretch# Define variables.# docker build -t nginx .# -v c:/unp:/mnt#PS C:\dockerNginx>docker run -it --name nginx -p 8080:80 -p #1935:1935 -v C:\streamServer:/mnt/c/streamServer -d nginx# nginx -c /mnt/c/streamServer/nginx.conf# Versions of Nginx and nginx-rtmp-module to useENV NGINX_VERSION nginx-1.19.8ENV NGINX_RTMP_MODULE_VERSION 1.2.1# Install dependenciesRUN apt-get update && \apt-get install -y ca-certificates openssl libssl-dev && \rm -rf /var/lib/apt/lists/*# Download and decompress NginxRUN mkdir -p /tmp/build/nginx && \cd /tmp/build/nginx && \wget -O ${NGINX_VERSION}.tar.gz https://nginx.org/download/${NGINX_VERSION}.tar.gz && \tar -zxf ${NGINX_VERSION}.tar.gz# Download and decompress RTMP moduleRUN mkdir -p /tmp/build/nginx-rtmp-module && \cd /tmp/build/nginx-rtmp-module && \wget -O nginx-rtmp-module-${NGINX_RTMP_MODULE_VERSION}.tar.gz https://github.com/arut/nginx-rtmp-module/archive/v${NGINX_RTMP_MODULE_VERSION}.tar.gz && \tar -zxf nginx-rtmp-module-${NGINX_RTMP_MODULE_VERSION}.tar.gz && \cd nginx-rtmp-module-${NGINX_RTMP_MODULE_VERSION}# Build and install Nginx# The default puts everything under /usr/local/nginx, so it's needed to change# it explicitly. Not just for order but to have it in the PATHRUN cd /tmp/build/nginx/${NGINX_VERSION} && \./configure \--sbin-path=/usr/local/sbin/nginx \--conf-path=/etc/nginx/nginx.conf \--error-log-path=/var/log/nginx/error.log \--pid-path=/var/run/nginx/nginx.pid \--lock-path=/var/lock/nginx/nginx.lock \--http-log-path=/var/log/nginx/access.log \--http-client-body-temp-path=/tmp/nginx-client-body \--with-http_ssl_module \--with-threads \--with-ipv6 \--add-module=/tmp/build/nginx-rtmp-module/nginx-rtmp-module-${NGINX_RTMP_MODULE_VERSION} && \make -j $(getconf _NPROCESSORS_ONLN) && \make install && \mkdir /var/lock/nginx && \rm -rf /tmp/build# Forward logs to DockerRUN ln -sf /dev/stdout /var/log/nginx/access.log && \ln -sf /dev/stderr /var/log/nginx/error.log
Start command line and issue the following command to build docker image from Dockerfile definition(cmd is opened at the same location as Dockerfile).
docker build -t nginx .
If the Nginx image is successfully created, We can issue the following command to run image Nginx as container Nginx. There are three specifications. Port mapping for HTTP is 8080:80, RTMP is 1935:1935, -v option with following parameter C:\streamServer:/mnt/c/streamServer will make the content of my C:\streamServer folder in windows available inside a container under /mnt/c/streamServer mount point. I love this file sharing between Linux and windows. I can edit all nginx configurations in windows directly and run nginx server from the configuration placed in windows. Here is the command explained above:
PS C:\dockerNginx>docker run -it --name nginx -p 8080:80 -p 1935:1935 -v C:\streamServer:/mnt/c/streamServer -d nginx
Write Opencv GStreamer application
This is our program. There is an RTSP pipeline used in the previous tutorial just commented out. There is a new RTMP Gstreamer pipeline used in this tutorial. In next section is described how to build this simple program in Visual Studio.
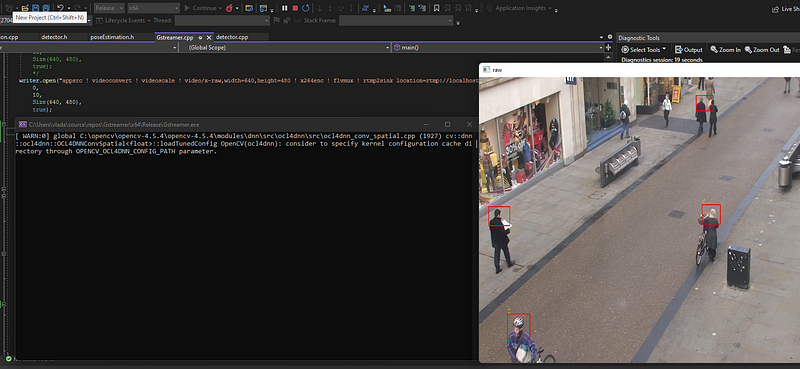
#include <iostream>#include <opencv2/imgcodecs.hpp>#include <opencv2/video.hpp>#include <opencv2/videoio.hpp>#include <opencv2/core.hpp>#include <opencv2/highgui.hpp>//#include "detector.h"//#include "poseEstimation.h"using namespace cv;int main(){//VideoCapture cap(0, cv::CAP_MSMF);VideoCapture cap("C:/www/town.avi", cv::CAP_MSMF);VideoWriter writer;/*OLD RTSP pipelinewriter.open("appsrc ! videoconvert ! videoscale ! video/x-raw,width=640,height=480 ! x264enc speed-preset=veryfast tune=zerolatency bitrate=640 ! rtspclientsink location=rtsp://localhost:8554/mystream ",0,10,Size(640, 480),true);*///NEW RTMP2SINK pipelinewriter.open("appsrc ! videoconvert ! videoscale ! video/x-raw,width=640,height=480! x264enc ! flvmux ! rtmp2sink location=rtmp://localhost:1935/live/Mystream ",0,10,Size(640, 480),true);/*poseEstimation pose = poseEstimation();Detector dec = Detector();*/Mat img;for (;;) {if (!cap.isOpened()) {std::cout << "Video Capture Fail" << std::endl;break;}cap.read(img);/*dec.ProcessFrame(img);dec.detect();Mat proc = dec.getResult();pose.ProcessFrame(proc);pose.drawResults();*/cv::resize(img, img, Size(800, 600));cv::imshow("raw", img);cv::resize(img, img, Size(640, 480));writer << img;cv::waitKey(25);}}
Configure the project and run the code in Visual Studio 2022
This is a standard Opencv configuration. Once OpenCV is built with GStreamer, Just ensure that the system variable path correctly points to GStreamer once again.

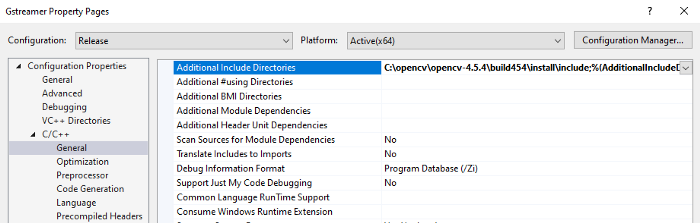
Configure for release project and set Additional include directory to location of Opencv include directory.
In the Linker option, Additional Library Directories point to your OpenCV installation to vc17\lib location.
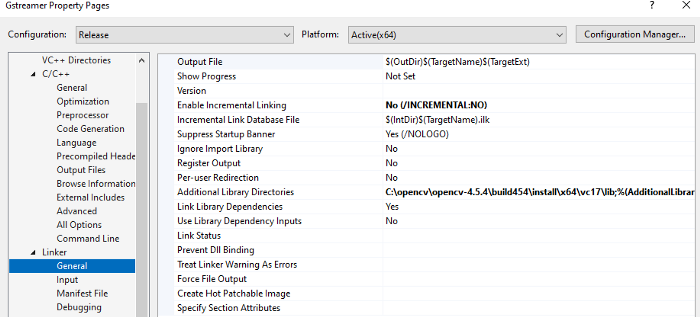
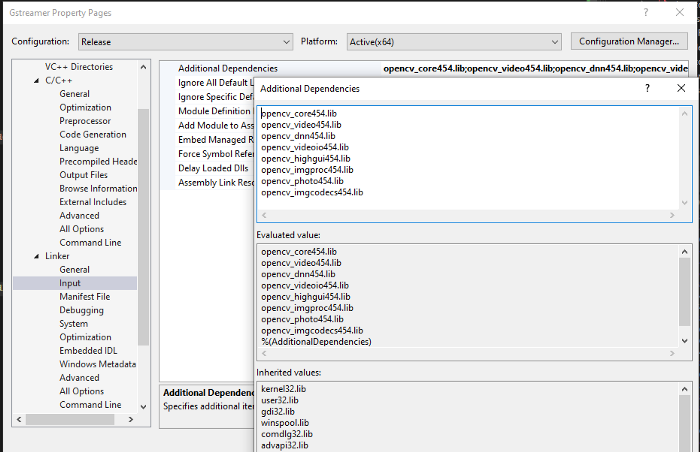
The last step is to set in Linker Input- Additional Dependencies with OpenCV libraries you want to use.
NGINX configuration
There is a lot to explain. In simple, the Server listens on 1935 port and produces an HLS video stream. The server will convert the RTMP stream to multiple TS segments and Mystream.m3u8 that is available under live/path http://localhost:8080/live/Mystream.m3u8 . This file holds the reference to TS segments and other information about my HLS stream. This is very simple. You have to go into the documentation of the NGINX RTMP module for more details. The following is content of /mnt/c/streamServer/nginx.conf
worker_processes  auto;
 error_log  /mnt/c/streamServer/err.log;
events {
    worker_connections  4;
}
rtmp {
    server {
        listen 1935;
        application live {
            live on;
            allow publish 127.0.0.1;
   allow publish all;
   allow play all;
            interleave on;
            hls on;
            hls_path /mnt/c/streamServer/hls;
            hls_fragment 15s;
            dash on;
            dash_path /mnt/c/streamServer/dash;
            dash_fragment 15s;
        }
    }
}
http {
    default_type  application/octet-stream;
    sendfile        on;
    keepalive_timeout 65;
     access_log /mnt/c/streamServer/ng.log;
    error_log  /mnt/c/streamServer/nge.log;
    server {
        listen       80;
        server_name localhost;
        location / {
            root   /mnt/c/streamServer;
            index  index.html index.htm;
        }
         location /live {
             types {
        application/vnd.apple.mpegurl m3u8;
               video/mp2t ts;
                text/html html;
            }
            alias   /mnt/c/streamServer/hls;
            add_header Cache-Control no-cache;
          }
        location /hls {
            # Serve HLS fragments
            types {
                application/vnd.apple.mpegurl m3u8;
                video/mp2t ts;
            }
            root /tmp;
            add_header Cache-Control no-cache;
        }

          location /tvds {
            root   /mnt/c/streamServer/dash;
            add_header Cache-Control no-cache;
          }
    }
}
Start NGINX from configuration located on mounted Windows location.
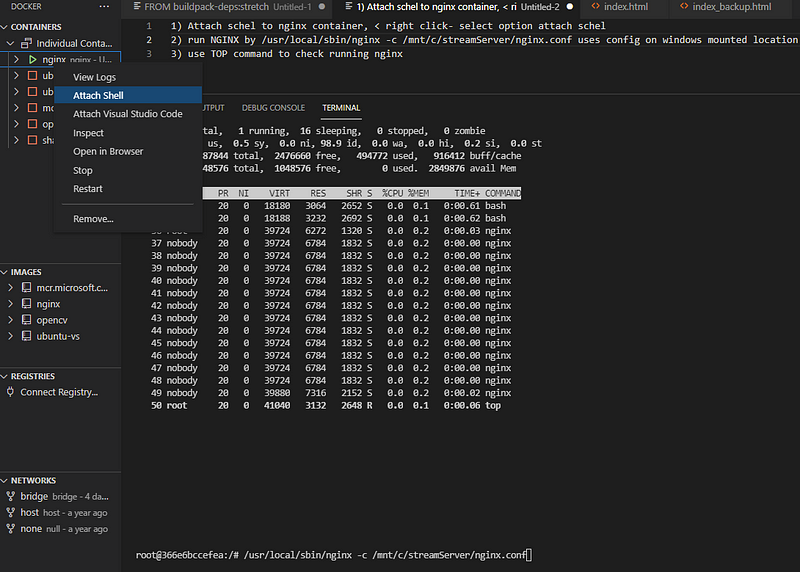
- Attach shell to Nginx container, < right click- select option attach shell
- run following command that uses config on windows mounted location. (Check where Nginx executable is located.)
/usr/local/sbin/nginx -c /mnt/c/streamServer/nginx.conf
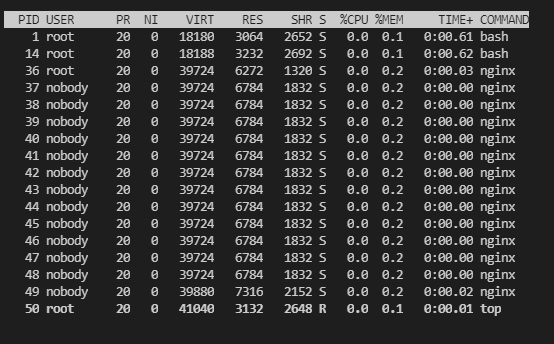
- use the TOP command to check running nginx
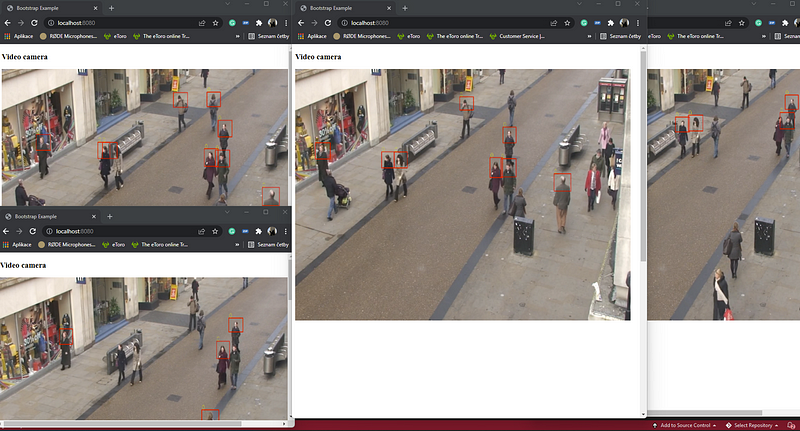
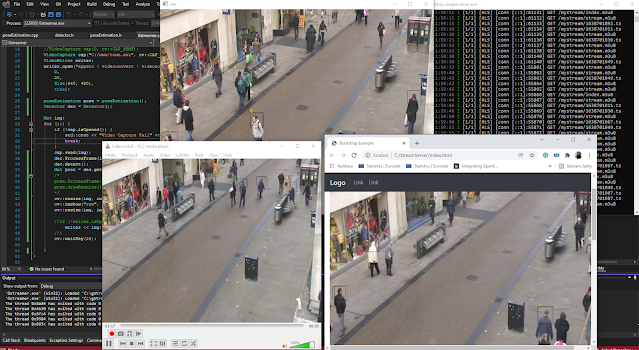
Lets stream. You can receive the video by VLC, but let's write a simple web player.
Web player
I am not a Web developer. My video player element uses the content distributed by http://localhost:8080/live/Mystream.m3u8 NGINX.
<video id='hls-example' class="video-js vjs-default-skin" width="800" height="600" controls>
<source type="application/x-mpegURL" src="http://localhost:8080/live/Mystream.m3u8"></video>
The full source code of my simple player. To play HLS, I am using videojs-contrib-hls.js and video.js libs.
<!DOCTYPE html><html lang="en"><head><title>Bootstrap Example</title><meta charset="utf-8"><meta name="viewport" content="width=device-width, initial-scale=1"><link href="https://vjs.zencdn.net/7.2.3/video-js.css" rel="stylesheet"></head><body style="height:1500px"></body><h3>Video camera</h3><video id='hls-example' class="video-js vjs-default-skin" width="800" height="600" controls><source type="application/x-mpegURL" src="http://localhost:8080/live/Mystream.m3u8"></video></body><script src="https://vjs.zencdn.net/ie8/ie8-version/videojs-ie8.min.js"></script><script src="https://cdnjs.cloudflare.com/ajax/libs/videojs-contrib-hls/5.14.1/videojs-contrib-hls.js"></script><script src="https://vjs.zencdn.net/7.2.3/video.js"></script><script>var player = videojs('hls-example');player.play();</script></html>
Play video from NGINX
If NGINX is running.
If Opencv Program is ready, compiled.
Try to replicate my results. Stream processed Opencv output to multiple web players, where the middle man is the NGINX server with RTMP module. Let me know. Cheers..
Youtube tutorial introduction and demo for RTMP NGINX Opencv app
References:


Our carefully curated wine list features selections from around the world, including rare vintages and local favorites. Our knowledgeable staff is on hand to help you select the perfect pairing for your meal. With its sophisticated decor, soft lighting, and attentive service, The Dining Room provides a refined and intimate dining atmosphere. It is the perfect setting for an unforgettable culinary experience. Visit us.