Building OpenCV 4.x, with FFmpeg on Ubuntu 22.04
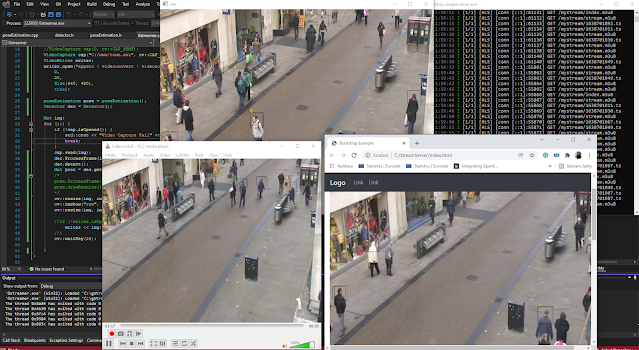
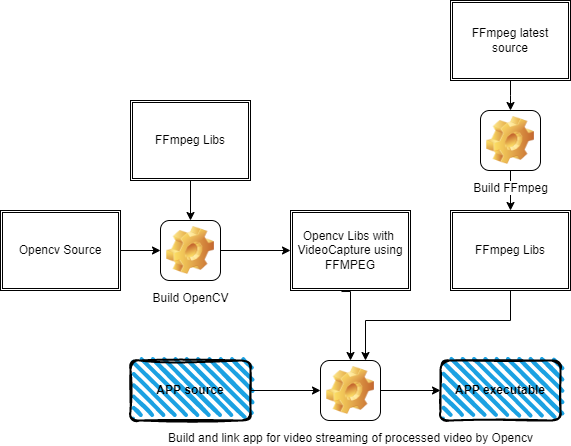
I compiled OpenCV from source code many times on different platforms and configurations. I recently tried to compile OpenCV on ubuntu with FFmpeg. So, I compile FFmpeg from the source. I tried to compile OpenCV from the source, linked to FFmpeg and failed. The short message is to use apt-get install for FFmpeg’s avlibsxxx instead of compiling from the source. Why do I get to this point? I need OpenCV lib compiled with FFmpeg for the application to read the video stream. Additionally, the final App needs Opencv with this setup as well as a custom FFmpeg build to create a streaming output of my processed video. So I need two different FFmpegs libs in the whole process. I will tell you more details in the following lines. So the goal is on the following picture. The App is linking Opencv libs( compiled with FFmpeg) and FFmpeg libs.
More Motivation for building Opencv with FFMPEG
Opencv can read video from many sources, using FFMPEG, DSHOW, MSMF, GStreamer, and other reader implementations. So in other words, The OpenCV Videocapture is capable of reading video from files and video streams. On the other hand, OpenCV VideoWriter is able to save a video in files but limited to creating a video stream. VideoWriter is able to stream video out of OpenCV by GStreamer Pipeline when GStreamer needs to be linked with OpenCV and runtime GStreamer installed on your system. I described more in the tutorial OpenCV to NGINX by RTMP and further to web in HLS here. I also published a compilation tutorial for OpenCV and GStreamer on Windows Visual Studio 2022 here.
So the goal is to write an application that reads video streams by Videocapture. The app processes the captured video stream. I will write an alternative VideoWriter based on FFmpeg to stream the video output using H265 further.
Compile FFmpeg from the source
This FFmpeg will not be used to build OpenCV. This FFmpeg will be linked with applications that use Opencv and FFmpeg to create custom video streaming output of processed video. The full compilation guide is quite nice. Here
- Get dependencies
sudo apt-get update -qq && sudo apt-get -y install \autoconf \automake \build-essential \cmake \git-core \libass-dev \libfreetype6-dev \libgnutls28-dev \libmp3lame-dev \libsdl2-dev \libtool \libva-dev \libvdpau-dev \libvorbis-dev \libxcb1-dev \libxcb-shm0-dev \libxcb-xfixes0-dev \meson \ninja-build \pkg-config \texinfo \wget \yasm \zlib1g-dev \nasm \libx264-dev \libx265-dev \libnuma-dev \libvpx-dev \libfdk-aac-dev \libopus-dev \libdav1d-dev
2) Get FFmpeg, configure, compile and install at once
sudo -u user sh -c ' mkdir ~/ffmpeg_sources && cd ~/ffmpeg_sources && \wget -O ffmpeg-snapshot.tar.bz2 https://ffmpeg.org/releases/ffmpeg-snapshot.tar.bz2 && \tar xjvf ffmpeg-snapshot.tar.bz2 && \cd ffmpeg && \PATH="$HOME/bin:$PATH" PKG_CONFIG_PATH="$HOME/ffmpeg_build/lib/pkgconfig" ./configure \--prefix="$HOME/ffmpeg_build" \--pkg-config-flags="--static" \--extra-cflags="-I$HOME/ffmpeg_build/include" \--extra-ldflags="-L$HOME/ffmpeg_build/lib" \--extra-libs="-lpthread" \--ld="g++" \--enable-shared \--bindir="$HOME/bin" \--enable-gpl \--enable-gnutls \--enable-libass \--enable-libfdk-aac \--enable-libfreetype \--enable-libmp3lame \--enable-libopus \--enable-libdav1d \--enable-libvorbis \--enable-libvpx \--enable-libx264 \--enable-libx265 \--enable-nonfree && \PATH="$HOME/bin:$PATH" make && \make install && \hash -r '
Build Opencv 4.x with FFmpeg Ubuntu 22.04
Now, I would like to build OpenCV with different (FFmpeg). The reason is stupid and simple. The previous FFmpeg newest version is not compatible with OpenCV 4.X Cmake (not sure why). Luckily, I do not care in my case.
- Install FFmpeg dependencies (libavformat-dev, code, format, util, swscale are installed by following the apt install command)
sudo apt install cmake libtbb2 g++ wget unzip ffmpeg libgtk2.0-dev libavformat-devlibavcodec-dev libavutil-dev libswscale-dev libtbb-dev libjpeg-dev libpng-devlibtiff-dev
2). Download, configure, and build OpenCV 4.X
Take the following commands one by one.
sudo wget -O opencv.zip https://github.com/opencv/opencv/archive/4.x.zipsudo unzip opencv.zipsudo mkdir -p build && cd buildsudo cmake -DHAVE_FFMPEG=ON ../opencv-4.x
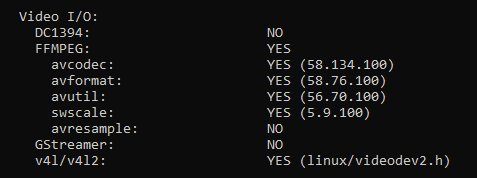
The result of the configuration CMake command above should list FFMPEG in your configuration before you will build OpenCV from the source. Your configuration before build should list the following values.
The next step is to compile in install Opencv by following.
sudo cmake --build .sudo make install
Cool, Done. So now, I have compiled and installed OpenCV with FFmpeg, and in different newest FFmpeg installations available in different directories.
Create Opencv APP and Link FFmpeg
So now, My new OpenCV application for video streaming. The class FFStreamOpencv is still under development and tuning. This class is using FFmpeg and the source code is not part of this text. Maybe, This topic will be part of some future discussion.
#include <opencv2/core.hpp>#include <opencv2/highgui.hpp>#include <opencv2/videoio.hpp>#include <opencv2/video.hpp>#include <iostream>#include "ffstreamopencv.hpp"using namespace cv;using namespace std;int main(int argc, char** argv ){if ( argc != 2 ){printf("usage: DisplayImage.out <Image_Path>\n");return -1;}Mat image;cv::VideoCapture video_capture;video_capture.open("/mnt/c/www/town.avi");int cap_fps = video_capture.get(cv::CAP_PROP_FPS);int cap_frame_width = video_capture.get(cv::CAP_PROP_FRAME_WIDTH);int cap_frame_height = video_capture.get(cv::CAP_PROP_FRAME_HEIGHT);FFStreamOpencv stream("main", "rtmp://localhost/live/mystream", cap_frame_width, cap_frame_height, 640, 480, 20, 500000);for (;;) {Mat image;video_capture >> image;stream.stream_image(image.data);namedWindow("Display Image", WINDOW_AUTOSIZE );imshow("Display Image", image);waitKey(0);return 0;}
FFStreamOpencv class is using my newest FFmpeg build with the following header files included.
extern "C" {#include <libavutil/opt.h>#include <libavcodec/avcodec.h>#include <libavutil/channel_layout.h>#include <libavutil/common.h>#include <libavutil/imgutils.h>#include <libavutil/mathematics.h>#include <libavutil/samplefmt.h>#include <libavformat/avformat.h>#include <libavcodec/avcodec.h>#include <libavutil/imgutils.h>#include <libswscale/swscale.h>}
I have simple custom CMakeLists.txt to build the app from app.cpp source and FFStreamOpencv.cpp source. You can see include_directories as well as target_link_libraries for my Opencv and FFmpeg.
cmake_minimum_required(VERSION 3.22ma)set(CMAKE_CXX_STANDARD 11)project(app)find_package(OpenCV REQUIRED)include_directories(${OpenCV_INCLUDE_DIRS})include_directories( /home/xxx/ffmpeg_build/include )add_executable( app app.cpp ffstreamopencv.cpp)target_link_libraries( app /usr/local/lib /home/xxx/ffmpeg_build/lib avcodec avutilavformat swscale ${OpenCV_LIBS} )
The CMakeLists.txt is used to compile and link my app by commands already used in this text.
cmake .make
I currently tuning video streaming to my Nginx server using the x265 codec. I am still not satisfied with the testing.
x265 [info]: HEVC encoder version 3.5+1-f0c1022b6x265 [info]: build info [Linux][GCC 11.2.0][64 bit] 8bit+10bit+12bitx265 [info]: using cpu capabilities: MMX2 SSE2Fast LZCNT SSSE3 SSE4.2 AVX FMA3 BMI2 AVX2x265 [info]: Main profile, Level-3 (Main tier)x265 [warning]: No thread pool allocated, --wpp disabledx265 [warning]: No thread pool allocated, --lookahead-slices disabledx265 [info]: Slices : 1x265 [info]: frame threads / pool features : 1 / nonex265 [info]: Coding QT: max CU size, min CU size : 64 / 8x265 [info]: Residual QT: max TU size, max depth : 32 / 1 inter / 1 intrax265 [info]: ME / range / subpel / merge : hex / 57 / 2 / 2x265 [info]: Lookahead / bframes / badapt : 0 / 0 / 0x265 [info]: b-pyramid / weightp / weightb : 0 / 1 / 0x265 [info]: References / ref-limit cu / depth : 3 / on / onx265 [info]: AQ: mode / str / qg-size / cu-tree : 2 / 1.0 / 32 / 0x265 [info]: Rate Control / qCompress : ABR-500 kbps / 0.60x265 [info]: tools: rd=2 psy-rd=2.00 rskip mode=1 signhide tmvp fast-intrax265 [info]: tools: strong-intra-smoothing deblock sao
Conclusion
This text can help you to build Opencv with FFmpeg. Especially, if you try to build OpenCV with custom FFmpeg and fail. Maybe switch directly to install needed FFmpeg libraries by apt install.
Additionally, This tutorial can help you to build FFmpeg on Ubuntu from the source.
Finally, this text will help you to create a CMake configuration to build and link your Opencv-based app for video processing with Opencv and FFmpeg built from the source.