
Featured Post

Opencv tutorial RTMP video streaming to NGINX restream as HLS

Video streaming Tutorial of sending processed Opencv video to NGINX and distributing video from NGINX (broadcast) by HLS stream for a wider audience, like multiple web players, VLC, or any other video stream receiver. Opencv application HLS streaming by GStreamer and NGINX  We will use GStreamer to send video from the Opencv application by rtmp2sink to an RTMP module in NGINX. In our example, the server is a widely used NGINX server with an Nginx-RTMP-module. The NGINX will receive RTMP video from Opencv and restream as an HLS video stream considered for multiple end consumers. This is a follow-up to the previous article about Video streaming from Opencv to RtspSimpleServer by rtsp protocol.   The goal is the same. Send video from Opencv to the server and restream the video for a wider audience. The difference is that RtspSimpleServer running on windows, NGINX is running in docker (WSL2). The one-to-one communication between Opencv and RtspSimpleServer was established by RTSP protocol

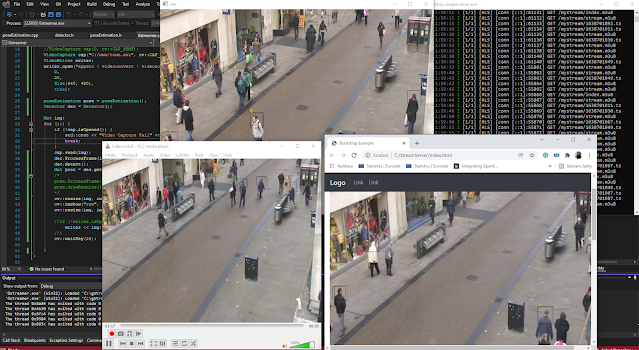
Opencv Web camera and Video streams in Windows subsystem for Linux WSL, by FFmpeg and GStreamer

Opencv in Windows Subsystem for Linux (WSL) is a compatibility layer designed to running Linux binary executables (in ELF format) natively on Windows 10. I love it. There are some limitations to mention. The first biggest is the lack of support of CUDA, which could be a limitation for deep learning application and learning in WSL. The second trouble for Opencv development is the lack of Web camera support. This suspends WSL almost on a useless level for me until now. 

VideoCapture cap;   is not working in WSL for now
cap.open(0); 

opencv WSL web camera ffmpeg
FFMPEG to WSL opencv program and back to WEB browser in windows
This Video capture is right now not possible at in Ubuntu running under Windows (WSL). I will hit this limitation in this article. I will show you how to reach a video camera and learn something more about video streaming. Yes, the opencv processed frames will be stream to the web player on simple web site.

Check the goal of this opencv tutorial on this video


What you will learn about Opencv and FFMPEG

  • Stream video from windows to Linux in WSL environment. 
  • Capture video stream in Linux opencv application 
  • Opencv compiled in Linux with GStreamer and FFmpeg 
  • Stream video processing output by GStreamer back to Windows 
  • present video stream from opencv in web browser HTML 5 video player 
It is pretty complex. The environment is not so easy to prepare. Actually, the environment and installation is the holy grail to achieve this goal. Additionally,  you will acquire good knowledge enough to work with IP cameras, Video streams and create your own video stream as a result of opencv processing. Let's dive into it.

Architecture, Behind opencv VideoCapture web camera 

There are windows 10, and Ubuntu Linux running on Hyper-V installed easily from the windows store. Windows has installed FFmpeg. Linux has installed FFmpeg, GStreamer and opencv build from source with support of both mentioned. Video capture is done by FFmpeg from Windows. Video is coded by the H264 codec and send to localhost UDP. UPD://127.0.0.1:5000. Video is captured in opencv by VideoCapture cap.open("UDP://127.0.0.1:5000"). The opencv installed with GStreamer by VideoWriter stream("send video to 127.0.0.1:5010"). The video is captured back in windows by ffmpeg where the source is RTP:127.0.0.5010 into MyOutput.mp4. This is the whole pipeline. You can capture stream produced from Opencv on Web. We will get there as well.
opencv video stream architecture gstreamer
Opencv FFMPEG GStreamer for WSL to WEB

Install  GStreamer apt-get (linux)

The following commands are valid for Ubuntu 18.04. running under windows subsystem for Linux. I am not sure about any special package repository to install GStreamer. I think that a special repository is needed to install extra support for H.265 codecs for example.  Google for more information or send me a message if you failed to install GStreamer. it is important. 
sudo apt-get install gstreamer1.0*
sudo apt install ubuntu-restricted-extras
sudo apt install libgstreamer1.0-dev libgstreamer-plugins-base1.0-dev

Build and compile FFMPEG (linux)

I am actually building FFMPEG from the source. Install some needed package by apt-get. Download source by wget, untar, configure build and compile by make. This is clear. It is not the basic tutorial. 
sudo apt-get -y install git make nasm pkg-config libx264-dev libxext-dev
libxfixes-dev zlib1g-dev

sudo wget -O ffmpeg-2.8.tar.bz2 "https://www.ffmpeg.org/releases/ffmpeg-2.8.tar.bz2"

sudo tar -xvf ffmpeg-2.8.tar.bz2
sudo rm -Rf ffmpeg-2.8.tar.bz2 cd /home/nomce/libs/ffmpeg-2.8


./configure --enable-nonfree --enable-gpl --enable-libx264
--enable-x11grab --enable-zlib
 make -j2
 sudo make install
 sudo ldconfig -v

If you are not able to install whole FFMPEG make sure that libavcodec-dev, libavformat-dev, libswscale-dev are installed. This should be fine to receive a video stream by cap.open("UDP://127.0.0.1:5000");.

Install FFMPEG in windows 

We are supposed to capture a web camera by FFMPEG in windows and send the stream into the Linux. We need to install the FFMPEG as well on the windows machine. Just download FFmpeg for windows here.  

Compile OPENCV with FFMPEG and GStreamer (linux)

This is pretty much as the opencv team describes the installation under Linux.  There is just one difference in CMAKE configuration -D WITH_GSTREAMER=ON -D WITH_FFMPEG=ON.

sudo apt-get install build-essential
sudo apt-get install cmake git libgtk2.0-dev pkg-config libavcodec-dev
 libavformat-dev libswscale-dev
sudo apt-get install python-dev python-numpy libtbb2
 libtbb-dev libjpeg-dev libpng-dev libtiff-dev libjasper-dev libdc1394-22-dev


git clone https://github.com/opencv/opencv.git

cd ~/opencv
mkdir build
cd build

cmake -D CMAKE_BUILD_TYPE=RELEASE -D CMAKE_INSTALL_PREFIX=/usr/local
 -D WITH_GSTREAMER=ON -D WITH_FFMPEG=ON ..


The output of CMAKE configuration should include FFMPEG and GStreamer. Otherwise, you can not continue and achieve the goal of this tutorial. 

--   Video I/O:
--     DC1394:                      YES (2.2.5)
--     FFMPEG:                      YES
--       avcodec:                   YES (57.107.100)
--       avformat:                  YES (57.83.100)
--       avutil:                    YES (55.78.100)
--       swscale:                   YES (4.8.100)
--       avresample:                YES (3.7.0)
--     GStreamer:                   YES (1.14.5)
--     v4l/v4l2:                    YES (linux/videodev2.h)

Once you achieve that Cmake configuration output contains FFMPEG and GStreamer compile and install opencv by following. This can take some time up to your machine. 

make -j8
sudo make install

Check your Opencv libraries installation

Your first simple program should be the following code. It will tels you of your opencv libs are OK. 
source.cpp
int main(int argcconst char** argv)
{
    std::cout << cv::getBuildInformation() << std::endl;

This source.cpp should be configured for compilation by CMakeLists.txt placed in same folder as your source.
cmake_minimum_required(VERSION 2.8)
project( ProjectName )
find_package( OpenCV REQUIRED )
add_executable( ProjectName source.cpp )
target_link_libraries( ProjectName ${OpenCV_LIBS} )

The results can look like this and important is part of Video I/O:, where FFMPEG and GStreamer should be lister with YES and version.
General configuration for OpenCV 4.1.2-dev =====================================
  Version control:               4.1.2-121-g5dd3e6052e

  Platform:
    Timestamp:                   2019-11-09T13:55:51Z
    Host:                        Linux 4.4.0-17134-Microsoft x86_64
    CMake:                       3.10.2
    CMake generator:             Unix Makefiles
    CMake build tool:            /usr/bin/make
    Configuration:               RELEASE

  CPU/HW features:
    Baseline:                    SSE SSE2 SSE3
      requested:                 SSE3
    Dispatched code generation:  SSE4_1 SSE4_2 FP16 AVX AVX2 AVX512_SKX
      requested:                 SSE4_1 SSE4_2 AVX FP16 AVX2 AVX512_SKX
      SSE4_1 (16 files):         + SSSE3 SSE4_1
      SSE4_2 (2 files):          + SSSE3 SSE4_1 POPCNT SSE4_2
      FP16 (1 files):            + SSSE3 SSE4_1 POPCNT SSE4_2 FP16 AVX
      AVX (5 files):             + SSSE3 SSE4_1 POPCNT SSE4_2 AVX
      AVX2 (29 files):           + SSSE3 SSE4_1 POPCNT SSE4_2 FP16 FMA3 AVX AVX2
      AVX512_SKX (6 files):      + SSSE3 SSE4_1 POPCNT SSE4_2 FP16 FMA3 AVX AVX2 

  C/C++:
    Built as dynamic libs?:      YES
    C++ Compiler:                /usr/bin/c++  (ver 7.3.0)
    C++ flags (Release):         -fsigned-char -W -Wall -Werror=return-type 
    C++ flags (Debug):           -fsigned-char -W -Wall -Werror=return-type 
    C flags (Release):           -fsigned-char -W -Wall -Werror=return-type -Werror=
    Linker flags (Release):      -Wl,--gc-sections  
    Linker flags (Debug):        -Wl,--gc-sections  
    ccache:                      NO
    Precompiled headers:         NO
    Extra dependencies:          dl m pthread rt
    3rdparty dependencies:

  OpenCV modules:
    To be built:                 calib3d core dnn features2d flann gapi highgui
    Disabled:                    world
    Disabled by dependency:      -
    Unavailable:                 java js python2 python3
    Applications:                tests perf_tests apps
    Documentation:               NO
    Non-free algorithms:         NO

  GUI: 
    GTK+:                        YES (ver 2.24.32)
      GThread :                  YES (ver 2.56.4)
      GtkGlExt:                  NO
    VTK support:                 NO

  Media I/O: 
    ZLib:                        /usr/lib/x86_64-linux-gnu/libz.so (ver 1.2.11)
    JPEG:                        /usr/lib/x86_64-linux-gnu/libjpeg.so (ver 80)
    WEBP:                        build (ver encoder: 0x020e)
    PNG:                         /usr/lib/x86_64-linux-gnu/libpng.so (ver 1.6.34)
    TIFF:                        /usr/lib/x86_64-linux-gnu/libtiff.so (ver 42 / 4.0.9)
    JPEG 2000:                   build (ver 1.900.1)
    OpenEXR:                     /usr/lib/x86_64-linux-gnu/libImath.so /
    HDR:                         YES
    SUNRASTER:                   YES
    PXM:                         YES
    PFM:                         YES

  Video I/O:
    DC1394:                      YES (2.2.5)
    FFMPEG:                      YES
      avcodec:                   YES (57.107.100)
      avformat:                  YES (57.83.100)
      avutil:                    YES (55.78.100)
      swscale:                   YES (4.8.100)
      avresample:                YES (3.7.0)
    GStreamer:                   YES (1.14.5)
    v4l/v4l2:                    YES (linux/videodev2.h)

  Parallel framework:            pthreads

  Trace:                         YES (with Intel ITT)

  Other third-party libraries:
    Intel IPP:                   2019.0.0 Gold [2019.0.0]
           at:                   /home/vlada/opencv/opencv/build/3rdparty/ippicv
    Intel IPP IW:                sources (2019.0.0)
              at:                /home/vlada/opencv/opencv/build/3rdparty/ippicv
    Lapack:                      NO
    Eigen:                       NO
    Custom HAL:                  NO
    Protobuf:                    build (3.5.1)

  OpenCL:                        YES (no extra features)
    Include path:                /home/vlada/opencv/opencv/3rdparty/include/opencl/1.2
    Link libraries:              Dynamic load

  Python (for build):            /usr/bin/python2.7

  Java:                          
    ant:                         NO
    JNI:                         NO
    Java wrappers:               NO
    Java tests:                  NO

  Install to:                    /usr/local
General configuration for OpenCV 4.1.2-dev =====================================
  Version control:               4.1.2-121-g5dd3e6052e

  Platform:
    Timestamp:                   2019-11-09T13:55:51Z
    Host:                        Linux 4.4.0-17134-Microsoft x86_64
    CMake:                       3.10.2
    CMake generator:             Unix Makefiles
    CMake build tool:            /usr/bin/make
    Configuration:               RELEASE

  CPU/HW features:
    Baseline:                    SSE SSE2 SSE3
      requested:                 SSE3
    Dispatched code generation:  SSE4_1 SSE4_2 FP16 AVX AVX2 AVX512_SKX
      requested:                 SSE4_1 SSE4_2 AVX FP16 AVX2 AVX512_SKX
      SSE4_1 (16 files):         + SSSE3 SSE4_1
      SSE4_2 (2 files):          + SSSE3 SSE4_1 POPCNT SSE4_2
      FP16 (1 files):            + SSSE3 SSE4_1 POPCNT SSE4_2 FP16 AVX
      AVX (5 files):             + SSSE3 SSE4_1 POPCNT SSE4_2 AVX
      AVX2 (29 files):           + SSSE3 SSE4_1 POPCNT SSE4_2 FP16 FMA3 AVX AVX2
      AVX512_SKX (6 files):      + SSSE3 SSE4_1 POPCNT SSE4_2 FP16 FMA3 AVX AVX2 

  
    To be built:                 calib3d core dnn features2d flann gapi highgui 
    Disabled:                    world
    Disabled by dependency:      -
    Unavailable:                 java js python2 python3
    Applications:                tests perf_tests apps
    Documentation:               NO
    Non-free algorithms:         NO

  GUI: 
    GTK+:                        YES (ver 2.24.32)
      GThread :                  YES (ver 2.56.4)
      GtkGlExt:                  NO
    VTK support:                 NO

  Media I/O: 
    ZLib:                        /usr/lib/x86_64-linux-gnu/libz.so (ver 1.2.11)
    JPEG:                        /usr/lib/x86_64-linux-gnu/libjpeg.so (ver 80)
    WEBP:                        build (ver encoder: 0x020e)
    PNG:                         /usr/lib/x86_64-linux-gnu/libpng.so (ver 1.6.34)
    TIFF:                        /usr/lib/x86_64-linux-gnu/libtiff.so (ver 42 / 4.0.9)
    JPEG 2000:                   build (ver 1.900.1)

    HDR:                         YES
    SUNRASTER:                   YES
    PXM:                         YES
    PFM:                         YES

  Video I/O:
    DC1394:                      YES (2.2.5)
    FFMPEG:                      YES
      avcodec:                   YES (57.107.100)
      avformat:                  YES (57.83.100)
      avutil:                    YES (55.78.100)
      swscale:                   YES (4.8.100)
      avresample:                YES (3.7.0)
    GStreamer:                   YES (1.14.5)
    v4l/v4l2:                    YES (linux/videodev2.h)

  Parallel framework:            pthreads

  Trace:                         YES (with Intel ITT)


  OpenCL:                        YES (no extra features)
    Include path:                /home//opencv/opencv/3rdparty/include/opencl/1.2
    Link libraries:              Dynamic load

  Python (for build):            /usr/bin/python2.7

  Java:                          
    ant:                         NO
    JNI:                         NO
    Java wrappers:               NO
    Java tests:                  NO

  Install to:                    /usr/local
-----------------------------------------------------------------

FFMPEG basics for this tutorial

FFMPEG is very powerful and this is very restricted to our purpose. You will definitely use the following commands.

FFMPEG list available devices

This command tel you information about microphones, cameras you can capture by FFMPEG
ffmpeg -list_devices true -f dshow -i dummy


FFMPEG devices list

Stream from FFMPEG to VLC first

This example will just perform the video stream from your web camera to the VLC player. The FFMPEG command will use input source -i as an integrated camera (web camera). The bit rate for the video stream should be chosen according to used codec and resolution. This setting mean video bitrate 2014 kbit/s -b:v 2014k. I used codec H.264 as clear by options -vcodec libx264. I hope that this helps -preset ultrafast -tune zerolatency as well. -ar is an audio sampling frequency rate. The full command is as follows. 

C:\ffmpeg\bin>ffmpeg -f dshow -i video="Integrated Camera"
 -preset ultrafast -tune zerolatency -vcodec libx264 -r 10
  -b:v 2014k -s 640x480 -ab 32k -ar 44100 -f mpegts -flush_packets
   0 udp://192.168.0.116:5120?pkt_size=1316

The task in VLC is much easier. Open Network stream and put here udp://@192.168.0.116:5120. Just make sure about @.  The result is a video from a web camera displayed in the VLC player.


Video stream VLC ffmpeg


Stream from FFMPEG Web camera to Opencv under WSL

Now connect FFmpeg and stream video into WSL opencv program. The first is to start web camera streaming like in previous case in VLC example.  
ffmpeg -list_devices true -f dshow -i dummy
C:\ffmpeg\bin>ffmpeg -f dshow -i video="Integrated Camera"
 -preset ultrafast -tune zerolatency -vcodec libx264 -r 10
  -b:v 2014k -s 640x480 -ab 32k -ar 44100 -f mpegts -flush_packets
   0 udp://192.168.0.116:5120?pkt_size=1316
The video is captured by VideoCapture cap("udp://192.168.0.116:5120");. The captured img frame is resized to match VideoWriter and send by GStreamer pipeline to same IP adress but different port host=192.168.0.116 port=8080

#include <stdio.h>
#include <opencv2/opencv.hpp>
#include <opencv2/objdetect/objdetect.hpp>
#include <opencv2/videoio/videoio.hpp>
#include <opencv2/imgcodecs/imgcodecs.hpp>

using namespace cv;
using namespace std;


int main(int argcconst char** argv)
{
    std::cout << cv::getBuildInformation() << std::endl;

 VideoCapture cap("udp://192.168.0.116:5120");
 VideoWriter videoStream("appsrc ! videoconvert ! videoscale !"
  "video/x-raw,width=320,height=240 ! theoraenc !"
  "oggmux ! tcpserversink host=192.168.0.116 port=8080"
   "recover-policy=keyframe sync-method=latest-keyframe sync=true"
   ,CAP_GSTREAMER,0,5,Size(320,240),true);


 for (;;)
 {
  if (!cap.isOpened()) {
     cout << "Video Capture Fail" << endl;
   break;
  }
  else {
   Mat img;
   cap >> img;
   cout << "Sending video back" << endl; 
   cv::resize(img, img, cv::Size(320,240));
   videoStream.write(img);
  }
 }
 return 0;
}

Once your program is compiled and FFMPEG sending video from windows. just run the code above in Linux. Once you receive a video frame from windows the "Sending video back" message will be displayed. Do not capture by VLC!! I have some problems to capture video stream from linux back in windows by VLC. Use the simple code below. 

Receive display opencv video stream on Web 

The simple web site is just a simple Html 5 video player, where the source is my video stream rtsp://192.168.0.116:8080.

<!DOCTYPE html>
<html>
        <head>
                <meta http-equiv="content-type" content="text/html; charset=utf-8">
                <title>opencv video</title>
        </head>
<body>
        <video id="video1" width=640 height=480 controls>
        <source src="rtsp://192.168.0.116:8080">
        </video>

<script> 
var myVideo = document.getElementById("video1"); 
function playPause() { 
  if (myVideo.paused
    myVideo.play(); 
  else 
    myVideo.pause(); 
function makeBig() { 
    myVideo.width = 560
function makeSmall() { 
    myVideo.width = 320
function makeNormal() { 
    myVideo.width = 420
}
</script> 

</body>
</html>

Great. You learned 

  • capture video stream in opencv,
  • send video from windows,
  • stream opencv result to web browser 
  • reach web camera in WSL

 This is all for now. Share and subscribe


Comments

  1. Have you tried to recreate this within WSL2?

    ReplyDelete

Post a Comment

Popular

Opencv GStreamer (windows) video streaming tutorial + full source code for RTSP HLS streaming

Opencv C++ simple tutorial to use GStreamer to send video to Server that converts RTSP to HLS video stream. The source code and all needed configurations are included.  O pencv is a powerful computer vision library. You can use it in production and use it for image and video processing and modern machine learning. In some applications, You may want to stream your processed video results from your C++ OpenCV app outside and not just use a simple OpenCV graphical interface. The video streaming of your results is what you are looking for. Do you want to stream processed video from your IoT device? Yes, This is mainly for Linux. Do you want to stream processed video to the Web player, broadcast the video or just use VLC to play video processed by OpenCV? You may be interested in reading the next lines.  Opencv video stream to VLC or WEB There are basically two main options with OpenCV. The first one is to write a streaming application using FFMPEG. This is a little bit more advanced appro

Compile Opencv with GStreamer for Visual Studio 2019 on windows 10 with and contribution modules

The goal of this tutorial is a simple step by step compilation of Opencv 4.2 with contribution extra modules with GStreamer as a bonus. The environment is Windows 10, Visual Studio 2019 C++ application. This took me almost one day of correcting of CMake setting. The goal of this tutorial is: compiled a set of OpenCV libraries with GStreamer and FFmpeg on Windows. I focus mainly on GStreamer. It is a little bit more tricky. You will reach the following information about your Opencv environment by compile and run this simple code. The Opencv GStreamer is turned as YES. GStreamer gives you a great opportunity to stream OpenCV output video outside of your program, for example, web application. I recently compiled with opencv 4.4. The update at the end of the post.  It is working!! wow, The working app and configuration in future tutorials. #include   <opencv2/opencv.hpp> #include   <iostream> using namespace cv; int   main () {      std ::cout <<  &q

Opencv HSL video stream to web

This tutorial will show you all components, configuration, and code needed to steam video output results from Opencv C++ to your Web player. The C++ program will take any video input and process this video. The processed video will be stream outside of OpenCV using the GStreamer pipeline (Windows part). The HLS video produces one Playlist file and several MPEG-TS segments of videos. This several HLS outputs are stored in the Windows file system. I am using WSL 2, windows subsystem for Linux to run Ubuntu distribution. Here the NGINX is installed with the RTMP module. NGINX is distributing a video stream from the windows file system to the web.  Let's have a look at this in more detail.  What is covered? Opencv C++ part + GStreamer pipeline NGINX configuration Architecture Web Player for your HLS stream What is not covered? Detailed instalation of Opencv + Gstreamer more here  GStreamer installation  ,  GStreamer Installation 2  on windows Detailed installation of NGINX + RTMP modul

OpenCV 4.5 simple optical flow GPU tutorial cuda::FarnebackOpticalFlow

This OpenCV tutorial is a very simple code example of GPU Cuda optical flow in OpenCV written in c++. The configuration of the project, code, and explanation are included for farneback Optical Flow method. Farneback algorithm is a dense method that is used to process all the pixels in the given image. The dense methods are slower but more accurate as all the pixels of the image are processed. In the following example, I am displaying just a few pixes based on a grid. I am not displaying all the pixes. In the opposite to dense method the sparse method like Lucas Kanade using just a selected subset of pixels. They are faster. Both methods have specific applications. Lucas-Kanade is widely used in tracking. The farneback can be used for the analysis of more complex movement in image scene and furder segmentation based on these changes. As dense methods are slightly slower, the GPU and Cuda implementation can lead to great performance improvements to calculate optical flow for all pixels o

Opencv C++ Tutorial Mat resize

Opencv Mat Resize   Resize the Mat or Image in the Opencv C++ tutorial. It is obviously simple task and important to learn. This tutorial is visualized step by step and well-described each of them. The main trick is in that simple code. Mat Input; Mat Resized; int ColumnOfNewImage = 60; int RowsOfNewImage = 60; resize(Input, Resized, Size( ColumnOfNewImage , RowsOfNewImage )); This code just takes an Input image and resized save to output Mat. How big is the resized image is based on the Size? Size just contains two parameters. Simple numbers of how the result should be big. The simple number of columns (width) and rows (height). That is basically it. Enjoy                                                 Boring same face again and again.  Load Image, resize and save Opencv C++ #include <Windows.h> #include "opencv2\highgui.hpp" #include "opencv2\imgproc.hpp" #include "opencv2\video\background_segm.hpp" #include &qu

Opencv C++ tutorial : Smoothing, blur, noise reduction / canceling

Smooth or blur, gaussian blur, and noise-canceling, This tutorial will learn OpenCV blur, GaussianBlur, median blur functions in C++. Additionally, the advanced technique for noise reduction  fastNlMeansDenoising family  will be introduced with a code example for each method.   You can use blurring of the image to hide identity or reduce the noise of the image.  Blur can be a very useful operation and it is a very common operation as well. For example, the anonymization of pedestrians, face or is one possible target for blue operation. The blur is the most common task to perform over the image to reduce noise. The noise reduction is more task for Gaussian blur than for simple blur operation. The various blur operations are very common for image processing on mobile devices.  The more important is the robustness issues of the data in pre-processing for machine learning. Sometimes, by blurring the images of the dataset can have a positive effect on the robustness of the achieved de

Opencv tutorial RTMP video streaming to NGINX restream as HLS

Video streaming Tutorial of sending processed Opencv video to NGINX and distributing video from NGINX (broadcast) by HLS stream for a wider audience, like multiple web players, VLC, or any other video stream receiver. Opencv application HLS streaming by GStreamer and NGINX  We will use GStreamer to send video from the Opencv application by rtmp2sink to an RTMP module in NGINX. In our example, the server is a widely used NGINX server with an Nginx-RTMP-module. The NGINX will receive RTMP video from Opencv and restream as an HLS video stream considered for multiple end consumers. This is a follow-up to the previous article about Video streaming from Opencv to RtspSimpleServer by rtsp protocol.   The goal is the same. Send video from Opencv to the server and restream the video for a wider audience. The difference is that RtspSimpleServer running on windows, NGINX is running in docker (WSL2). The one-to-one communication between Opencv and RtspSimpleServer was established by RTSP protocol

Opencv 3.1 Tutorial Optical flow (calcOpticalFlowFarneback)

Farneback Optical flow Opencv simple C++ tutorial and code to achieve optical flow and farneback optical flow of moving an object in OpenCV video. Let's check the video example and the achieved result on my blog. Working and well describe code is included.  Optical Flow Farneback parameters remarks You need 2 images at least to calculate optical flow, the previous image (prevgray) and the current image (img).  !! The previous image must be initialized first !! Both images have to be grayscale.  The result is stored in flowUmat which has the same size as inputs but the format is CV_32FC2 calcOpticalFlowFarneback (prevgray, img, flowUmat,  0.4 ,  1 ,  12 ,  2 ,  8 ,  1.2 ,  0 ); 0.4- image pyramid or simple image scale 1 is the number of pyramid layers. 1 means that flow is calculated only from the previous image.  12 is window size. Flow is computed over the window larger value is more robust to the noise.  2 mean number of iteration of the algorithm 8 is polyn

Opencv 4 C++ Tutorial simple Background Subtraction

This method is used to learn what belongs to the background of the image and what belongs to the foreground. The static cameras that monitor the area can very easily recognize, what is part of the image that is always here or there is something that is new and moving over the background.  Background subtraction Visual studio 2019 project setup If you have Opencv 4+ compiled or installed only steps you need to do is set the include directory with OpenCV header files. Set the Additional library Directories that point to \lib folder. Just note that Visual Studio 2019 should use VC16 \lib. Finally, As additional dependencies, specify the libs used to resolve the function implementation in the code. The list for Opencv 420 is here. The different version of opencv is using different numbering for example opencv 440 will use opencv_core440.lib.  opencv_bgsegm420.lib opencv_core420.lib opencv_videoio420.lib opencv_imgproc420.lib opencv_highgui420.lib opencv_video420.lib  Background sustract